Thursday, January 31, 2013

Madrona Road Challenge - Completed!

I finished my Madrona Road Challenge Quilt for the (Kansas City) Modern Quilt Guild!

The challenge was presented to us in the KCMQG in an email:
Create a modern quilt based on or inspired by a traditional block. This can mean changing the scale of the block, improvisational piecing of the block (similar to wonky log cabins and wonky Ohio stars), use of asymmetry, negative space, etc. The traditional block must appear once somewhere in the quilt (even if it is on the back!).
If you're stumped about which block to use as your inspiration, feel free to browse this database!
Size: Your finished quilt should be at least 18" x 18". At most? Well, if you've been needing to make a quilt for that king size bed and you can get it done in a month, go for it!
Other fabrics: You will receive a pack of seven fat eighths (one of each fabric). You are welcome to add additional Madrona Road fabrics (any of them) or solids (or solid-ish fabrics) to your project.

Skyscraper (26"x38")

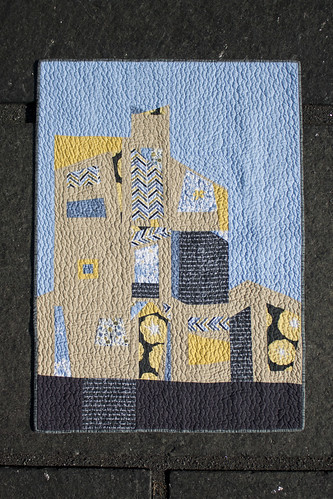
The block I chose to start my quilt off is on the left side of the quilt in about the middle.  Do you see it?  It's a log cabin.

I had fun building this little quilt.  I started with the log cabin block and built the strip you see it in.  After that, I just started improvisationally adding to the quilt in strips.  I had in my head from a sketch I shared previously that I wanted it to look somewhat like a cityscape.

Skyscraper - Back

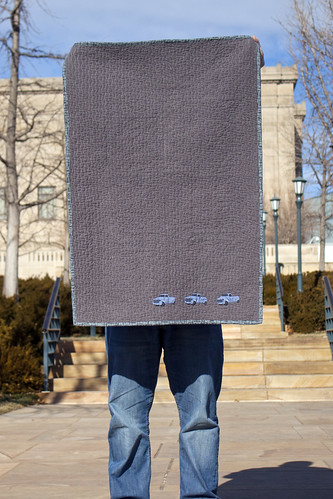
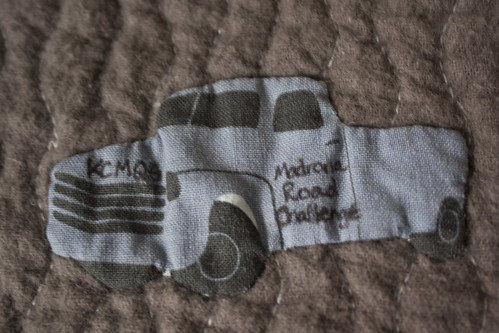
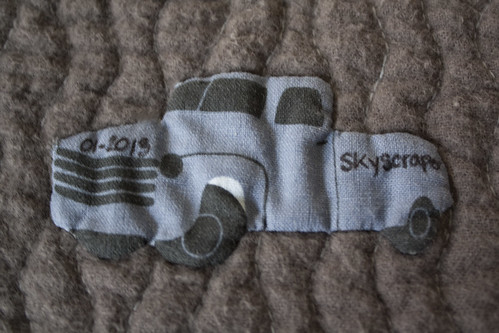
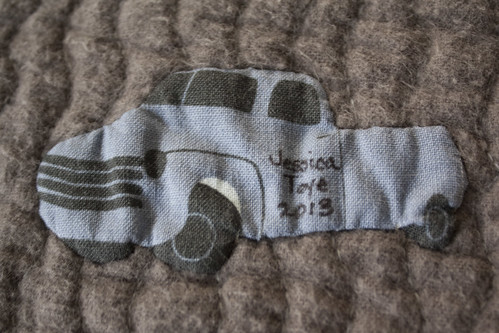
I love quilts that have cuddly backs.  I found this dark grey flannel and thought it was the perfect back for this quilt.  I bought a bit of the fabric with the trucks from the Madrona Road line and appliqued the trucks to the bottom of the back and used them as my labels.

Truck 1

Truck 2

Truck 3

Can you see how I quilted it?  I used the squiggly wiggly stitch my machine has programmed into it and just went in straight vertical lines down my quilt using my walking foot.  I love the way it crinkled up when washed.  And it was super fast to do!  It only took me about 1.5 naptimes to get it quilted!  (1.5 naptimes is about an hour and a half of real work time.)

Skyscraper - Telescope

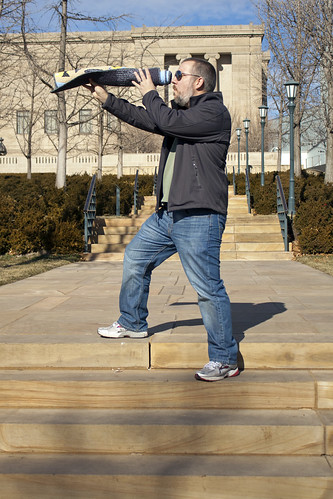
We took a little family outing on a beautiful January day to the Nelson-Atkins Art Museum.  I had in mind a photograph of my quilt with this awesome sculpture of headless bodies by Magdalena Abakanowicz and that was the whole reason we went down there.  I had my trusty quilt photographing assistants with me.  Daniel  was on my back in the mei tai I made (will have to blog about that) and Jason was going to stand behind one of the sculpture bodies and pretty much hug around it and hold my quilt in front.  It was going to be awesome. So, here we are... our little family is out setting up this shot, Jason has climbed into the middle of the bodies and is getting his arms around the sculpture when we hear "Sir.  We need you to step away from the sculpture.  Please enjoy your visit."  Ah!  Caught by security and scolded over the loudspeaker AND I can't get the shot I wanted of my quilt.  

Now, I'm all for not touching things, but come on.  The sculpture is outside.  It gets rained on.  It gets snowed on.  Birds are free to crap on it.  Why can't I photograph my quilt with my husband standing behind it?

Maybe that's why I became a quilter and studied architecture in school.  I'm drawn to mathematically inspired design.  I don't really understand why something somebody creates is so precious that nobody else can touch it.  Okay... maybe mummies and such shouldn't be touched, but only because they're ancient and if they've survived that long they should maybe be allowed to not have smudgy fingerprints on them.  Maybe this is the reason I'm a fan of this quilt.  I think things that are made should be used.  Quilts should be slept under.  Tables should have books on them.  Buildings should be stood in.  Sculptures that birds can poop on should be available for me to touch.  

Anyway... that's my ramblings about art and the artistic attitude.  Things should be touched.  Quilts should be rolled up and used as a telescope.  They should be played with.  I make things with the intention of them being dragged through the mud and thrown in the washing machine.  That's my two cents... or should it be more like my two bucks with inflation figured in since that saying came around.  

Quilt SpecsTitle: Skyscraper 
Fabric used:
  • Quilt top: Madrona Road in blue colorway, Kona Raffiea, Kona Cornflower, and Kona Charcoal  
  • Quilt back: Dark grey flannel & labels from Madrona Road "Farmstead" print 
Approximate size: 26"x38" 

Blogged about while in progress here, here, and here.

-Jessica


Monday, January 28, 2013

TEXTURES Quilt

I think commissions are fun. Some people dread making projects for people. They are afraid that the person won't like them. I think they are a challenge and try really hard to make sure the person I'm making the quilt for will like it.

Fabri-Quilt asked me to come up with something modern to use as a display quilt to showcase some of their pre-quilted fabric. What?! was my first thought and then about 4 seconds later I thought, ooooh! 


I messed around with my idea a little bit in a sketch book. I played a bit in EQ7 to get an image to send and then added the notes to it. When I emailed them my idea, I said something like:
This is a really rough representation of my idea. Modern quilters are all about improvisional piecing, so I'd like to do a lot of that along the right side where you see the horizontal stripes. I also like the idea of spelling out TEXTURE as an "in your face" way of saying come look at me! I have textures for you to see!
They liked the idea and let me run with it. This is what I came up with.


It's fun when you go to deliver a quilt and the client doesn't know exactly what you will give them. They thought it would be pretty out there, but I think they were really in love. I like the way it came out and really liked the piecing on the right side. It's probably something I will try again in the future.

Monday, January 21, 2013

Tiger Stripes Quilts


Aren't twins fun? Some friends of ours have boy/girl twins that are 3 1/2 months younger than my little guy. Their parents are big Mizzou fans, so my husband and I decided that black and gold quilts were the way to go. 

I was inspired by this pin on pinterest. Chevrons are so popular right now, but I really liked the rhythm this had. It didn't hurt that I thought it looked a bit like tiger stripes! (Missouri's mascot is the Tigers).

When I had Daniel, we were given so many awesome quilts and blankets. I wanted to do something special for the twins that not everybody would think of. I came across this quilt on pinterest that is sized to fit on a car seat. It has little ties to attach it to the handle so baby stays cozy warm underneath. I liked the idea and thought it would be something not everyone would give and also something I would have used with my little guy. I followed the tutorial of that car seat quilt to make everything but the quilt top. 


The quilt above I made with Maggie in mind. It's has a lot of the gold fabric and is quilted with a gold thread. 


It looks good on the car seat, too, don't ya think? My little Daniel was such a trooper. It was a warm day and he let me take photographs of him and his giraffe, Sophie without much complaint.


A.J.'s quilt (shown above) has more black in it than Maggie's. It is quilted with black thread, too. 


I like the idea of labels on quilts, but I don't love the plain old "Made by Jessica Toye in Kansas City, MO on January 2013." That's so boring to me. If that's all I can come up with for a label, unfortunately I tend to leave them off the quilt all together. For this pair of quilts, I printed off the Mizzou Tiger head and used my light box to trace the image onto white fabric and wrote the babies a little message. I thought it was a fun little way to spice up the label and throw in just a tad more tiger pride for the Mizzou fans.

The quilting on these is just straight lines. I love the look of straight lines, but every time I do it, there seems to be at least one spot where I get off by a noticeable amount and end up wishing I had done another method. Oh well! Maybe someday I'll remember these things before I do the same thing over again.

I love the way these turned out. I showed my husband the inspiration pin I had in mind and just cut strips and whacked things to get them to the right size. It's a lot of fun to work without a super strict end goal in mind.
I mention pinterest a lot in this post. If you'd like to follow me, you can find me here. I tend to pin a lot of quilting, sewing, baby, and projects for around the house.
-Jessica 

Friday, January 11, 2013

Fingerpainting Thank You Cards

In our family, thank you cards are an important part of the gift giving process.  If someone gives you any sort of gift at all, you send a thank you card.  I struggled with how to involve my one year old son in the process.  


I came up with this idea for him to have some part in creating the cards.  I put down some plastic and pulled the high chair into the kitchen, put my little man in some clothes I wouldn't be heartbroken if they were stained and we had a blast fingerpainting.  We used Crayola washable fingerpaints and spread them on plain white cardstock.  I used a little paper plate to make him a palette.  I held it out for him to smack a few times and then directed his hand towards the paper.  


Just in case it wasn't obvious that my baby was the artist on the cards, I added a little artist's statement on the back of each card.  It read:
The art on the front of this card was created by Daniel Toye, age 1.  Daniel resides in Kansas City, MO with his mommy and daddy and their cat, Lily.  Daniel enjoys playing with his toys, (especially balls and blocks) reading books, making messes, getting dirty, and chasing after Lily.   
Daniel made the art on the front of this card as a way of showing his gratitude for the gift that you gave him.  His fingerpainting is our way of teaching him the importance of and involving him in the process of writing thank you cards to those who have given him a gift.   
January 2013 

 
I let the paintings dry for a day and then used my paper slicer to cut them into 4"x5 1/2" rectangles.  


I printed the black border on the front of each card and the artist's statement on the back.  The cards were just 6 1/2" x 10" precut cards we had laying around.  I think they were the cheap ones from Michael's.  


I used tacky glue and a popsicle stick to slather on a bit of glue to each of the paintings.


Stuck the painting to the front of the card.


And wrote a message on the inside. 


They were fun to make.  Simple even.  And I think they are beautiful.  


My little guy was involved in the process.


And everyone received a special card from us.


-Jessica

Wednesday, January 9, 2013

WIP - Madrona Road Challenge - Fabric Selection

I did it.  I picked out the solid fabrics to pair with the Madrona Road fabrics for my challenge quilt.  Before I headed out to the store, I shopped my stash and guess what I found!  I found what should be enough fabrics to make my quilt top.  I'd really like to back the quilt in this print from the Madrona Road line.  I love quilts backed in flannel best, but I really, really, really love the trucks on that print.


So, what did I add you ask?  Raffia, Cornflower, and Charcoal in Robert Kauffman's Kona Solids.  I also have a bit of Kona Canary that I think might be my binding.  We'll see what I think when the top is done.  It's probably more likely that my binding will be from the charcoal.  I love a dark binding on a quilt.  Or maybe I'll finally try the fake piping binding tutorial I've been drooling over on pinterest and use both!

-Jessica

Tuesday, January 8, 2013

WIP - Madrona Road Challenge


Do you like seeing things in progress?  I hope so.  I am planning to share a lot of my projects in progress with you.

I mentioned in an earlier post that I'm a member of the Kansas City Modern Quilt Guild.  Our guild is participating in the Madrona Road Challenge.  The rules given out for the Kansas City edition of the challenge are this:
Create a modern quilt based on or inspired by a traditional block. This can mean changing the scale of the block, improvisational piecing of the block (similar to wonky log cabins and wonky Ohio stars), use of asymmetry, negative space, etc. The traditional block must appear once somewhere in the quilt (even if it is on the back!).

We can add any of the Madrona Road prints and solid or solid-ish fabrics we like to our quilt. 

I had no idea where to start.  I decided the best place to begin would be to tape my fabrics to the wall where I could look at them.  So, on my living room wall they went.


I looked at them for a day and then decided I was going to do a twist on the log cabin.  


And that is where I am.  I'm thinking I'll call it highrise.  I just need to go get some solid fabrics to pair with it and get chopping!

- Jessica

Monday, January 7, 2013

Connections Quilt


I mentioned in our first post that I sometimes do design work for Fabri-Quilt. This quilt is one such example. They asked for a quilt that showed off some of their flannel line. This is what I came up with.


I often use EQ7 to design my patterns. Sometimes I will start with a sketch or an inspiration from somewhere else, but I use the quilt design program to test out my ideas and draft my designs. The image you see above is the image I sent to the people at Fabri-Quilt to show them my idea for the quilt. I use this sort of image to establish a design, determine fabric placement, create an arrangement of blocks, and figure yardage. 

I don't always design so precisely. If I'm doing a design as a commission, this is the easiest way I have found to give the person an idea of what I have in mind. They can visualize what I see in my head a whole lot better when I hand them an image than if I try to explain what I see in my mind. 

If I am designing something that doesn't need to conserve fabric and nobody is relying on me to do it right the first time, I do like to chop into fabric. I like to chop, sew, repeat quite a bit. I have a post in the works about a pair of quilts I made for friends of ours with twins that was a much more freestyle approach to quilting.  


This quilt went together pretty quickly. Basically, it's a simple log cabin quilt with one ring of pieced "logs". The quilting on this quilt was rather simple, too. You can see in the photo above I echo-quilted the red pieces 1/4" from the outside of them. The blue part is probably my favorite, though. I used my walking foot to create an "x" in each of the legs of the cross. I think it came out looking like a star. It is definitely a quilting method I will use again. 

And is my baby adorable or what? Quilts are cool and all, but they are 400 times better with a cute baby sitting on them.  

-Jessica

Friday, January 4, 2013

Hello there.

Welcome to our blog!  We are mother & daughter blogging team Susan & Jessica. We're excited to embark on this blogging adventure and share some of our crafty experiences with you. Ready to see what we have in store? We hope so!

We know it's not the most exciting of blog posts, but we think it's important to tell you a little about ourselves, so please stick with us. We promise it will get a little more crafty soon.


Well hey there. I am Susan and I reside in Omaha, Nebraska, with Kevin, my mate of thirty years. Our youngest daughter, Katie, also shares our home. I work as an occupational therapist by day and make stuff when not working. I enjoy creating a variety of things. Including, but not limited to:  quilts, clothing, house hold items, purses, totes, toys and sometimes TROUBLE! 


Contributing to a blog is a new adventure for me and I am pleased to be sharing it with my oldest daughter, Jessica. I look forward to exploring this blogging world and I hope to develop a better process for contributing to our blog. (meaning I won't need to be led step by step) We are glad you are here and hope you will tag along with us because you just never know what we might be creating next.


I'm Jessica.  I'm 28 & have been married to Jason for five and a half years. We have one amazing little guy, Daniel, who just celebrated his first birthday last week. I love to sew just about anything (except clothes for anyone but Daniel), but really love quilting. I'm a member of the Kansas City Modern Quilt Guild and am a big fan of the modern quilt movement. I am a big fan of doing quilts start to finish and love coming up with my own patterns and designs. I've been published in various quilting magazines multiple times and have designed quilts for Fabri-Quilt. I have a blog of my own that I posted to fairly frequently before the little man arrived; you can find it here. I'm looking forward to 
sharing a new blog with my mom and hope we can inspire or teach our readers how to do something new.

Keep Cluckin'
Susan & Jessica